Hardness testing – The 7 largest challenges with eddy current systems
The mechanical properties of components are specified based on the requirements in their final application. In addition to features such as dimensions and surface properties, the specification of a component also contains material-specific properties.
|
Table of contents |
For instance, some applications require special material alloys with a specific modulus of elasticity. The modulus of elasticity can be changed by the heat treatment of the material alloy. To obtain the correct modulus of elasticity, the material alloy and the heat treatment process must be defined very precisely. The smallest process deviations or the alloy components can result in the desired material properties not being obtained and the component failing in application. |
What effects do hardening processes have on mechanical components?
Various hardening processes such as induction hardening or hardening in an oven are used to harden components. Suitable hardening processes are selected in combination with the material alloy used. In the process, it is often crucial to know whether there are mobile carbon molecules in the alloy or whether they have to be added during the process. The heat treatment process changes the structure of the material. While doing so, the components are often exposed to very high temperatures to maintain the lattice transformation of the structure.
Mechanical components are also often quenched and tempered. Quenching and tempering involves hardening the component with subsequent tempering, i.e. the targeted heating of the material as a means to maintain further properties in addition to the basic structure. Tempering is intended, for example, to reduce residual stresses in the component or to reduce the brittleness in the edge areas. In doing so, unwanted defects due to surface loads are avoided.
Which material properties are important for hardness testing?
In series production, various properties relevant to the material of mechanical components have to be verified with a test. These include, among other things, the surface hardness, the hardening depth, and the structural assemblage of the component.
Several methods are suitable for recording the material properties of a component within quality control. The component hardness can be determined either quantitatively by a measuring method or through a testing method. In contrast to testing, which uses a comparative method, the measured values refer to an ISO unit during measurement and can, therefore, be determined quantitatively. The comparative test procedure examines whether defined component properties have changed or are behaving constantly. For eddy current testing so-called good parts are taught and used as a reference in comparison with the test parts.
There is a causal relation between the magnetic and conductivity properties and the hardness properties of a material. This causal relation can be recorded in a test using eddy current testing systems. To do so with eddy current test systems, they must be defined in a component specification and a suitable setup. This consists of a test device, a test coil, and the design of an automatic or manual feed setup.
For a stable process, as many good parts as possible are taught to the system with the defined setup, and test limits are defined for the bad parts based on these results
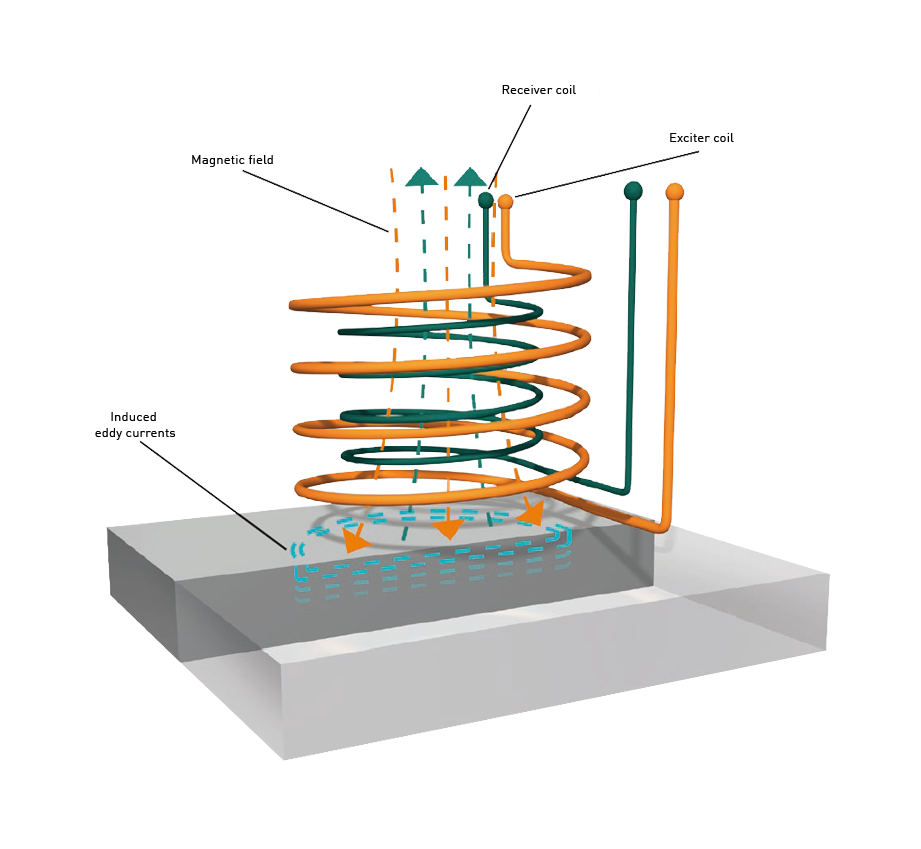
An alternating electrical field is generated in a primary winding in the test coil, which is coupled into the test specimen. This alternating magnetic field creates eddy currents in the test material which counteract the primary field and are referred to as the secondary magnetic field. The primary and secondary fields work against each other and the resulting field generates an induction voltage in the test probe, which is recorded and processed by electronics.
The formation of eddy currents and the associated secondary magnetic field depend on the conductivity of the component material, the component structure, and its magnetic susceptibility. In contrast to magnetic permeability (or magnetic susceptibility), the electrical conductivity is strongly dependent on the temperature. When the temperature changes, both the conductivity and the secondary magnetic field change, strongly influencing the test result. This necessitates a stable temperature of the test part during a test. Furthermore, a change in temperature can have a direct influence on the test coil, since the inductances of the test coil usually consist of copper turns and, like the test specimen, these change their conductivity with temperature. Changes in conductivity have an effect on the impedance characteristics of the coil and thus on the primary field generated. Crack and Structure TestingThe eddy current method can be divided into two basic areas of application: eddy current crack testing and magneto-inductive material and structure testing. The high-frequency crack testing detects surface-open material defects such as cracks, overlapping or pores. Neither contact nor coupling media between the component and the probe are needed, so even delicate surfaces can be easily tested. In order to ensure high stability, the distance compensation can be used with variations of the probe distance. Magneto-inductive testing uses low frequencies. The components are thus tested for their material properties in order to avoid material mix-ups or to determine different heat treatment conditions. Some of the typical sorting criteria are alloy proportions, surface hardness, hardening depth, strength, and microstructure characteristics.
|
What are the challenges of hardness testing with eddy current devices?
Each test or measurement method has advantages and disadvantages to be weighed up. For instance, the Vickers method can cause undesirable surface damage. Furthermore, it is difficult to implement it in an automated test or measurement process. In the case of eddy current-based hardness testing, however, the following factors must be taken into account:
- The placement of the component in the test coil is crucial for the reproducibility of the test.
- Temperature fluctuations during the measurement must be prevented to avoid drift effects in the test results.
- The test frequency must be clearly defined. Among other things, it influences the penetration depths of the eddy current into the component, thus, which hardness profiles are checked.
- Magnetization in components must be prevented because their residual magnetic fields prevent high repeatability.
- Changes in the material composition, such as differences in alloys, influence the test result.
- The different hardness levels of the components can produce almost identical test signals if the magnetic properties are very similar despite the different hardness levels.
- Environmental influences in the production process rising from magnetic materials or magnetic fields can disrupt the test.
The challenges and their effects are the following:
Reproducibility of hardness test results
The implementation of the component feed to the testing process plays a crucial role in the reproducibility of the results. It is important to make sure that the supply of the test part remains constant. For example, test parts with the same component surface must always lie on a conveyor belt or handling system. In the case of asymmetrical test parts, their alignment is also relevant.
The test system usually triggers the examination automatically when components pass through the test coil without stopping the process. If the test is triggered by an external control system, statecontrolled timing is essential. Otherwise, the test position will vary and the results in the measured values will be more scattered.
When using test probes, it must be ensured that they inspect the same location for each test object and that the angle and distance of the test probe are reproducibly guided to the test object. Variations of just a few tenths of a millimeter can render the result unusable. For applications with a test button, it is also recommended touching the contact sensor for the measurement, as this contributes to the stability of the measurement.
.png?width=1280&name=AdobeStock_181122677-(1).png)
Temperature effects on eddy currents-based hardness testing
The results of the eddy current method are based on the electrical and magnetic properties of the test material. The temperature effects on the test can be countered with different solutions. For instance, to minimize the temperature drift, conductivity measuring devices offer the possibility to balance the temperature via a temperature sensor integrated into the test coil. To this means, a temperature curve is recorded once and a correlation with the change in the primary field is established. This correlation can be used in the application to perform the signal correction.
While electrical conductivity is the only mechanism of action for non-ferromagnetic materials, ferromagnetic components offer additional options for extracting information from the secondary signal. When testing a ferromagnetic material, signal curves are used to map the magnetic permeability. As already mentioned, the permeability and the mechanical hardness are causally related, so that an evaluation of the permeability allows a statement about the structural information. Magnetic material properties have an advantage: they are far more temperature stable than the conductivity described above. Even temperature deviations of over 50 °C only have a minor influence on the measurement signal, as long as the testing is carried out below the Curie temperature. To ensure that only the magnetic properties are used for evaluation for a temperature-stable test, the so-called harmonic analysis is suitable.
The evaluation signal or the measurement signal generally consist of frequency components from the excitation signal and the harmonic signals, also called harmonic signals. While the frequency components of the ground wave have information from the electrical conductivity and magnetic permeability, harmonics only contain information from the magnetic permeability. The evaluation of the harmonic signals, therefore, provides a more stable test signal, since temperature influences do not affect the test result. However, the evaluation of the harmonic signals is very complex and requires a good signal-to-noise ratio, as well as a good algorithm for signal evaluation.
Influence of the test frequency on the measurement result of the hardness test
The test frequency used for the eddy current system notably influences the penetration depth of the eddy current. A high frequency affects the surface properties in the test specimen. A lower frequency is used to check certain hardening depths or hardness profiles. If the properties to be tested are known, the parameters are consistently optimized, i.e. a specific frequency is selected to test this particular criterion. Setting a specific frequency allows a more precise test process. Consequently, the test results contain fewer errors and variance.
If, in addition to a primary criterion, e.g. the hardness depth, other parameters are to be checked, such as the surface hardness, the one test frequency can be optimized for the hardness depth and another test frequency for the surface hardness properties. As a result, the examination can be expanded by a targeted multi-frequency test. With these different frequencies, a distinction can also be made whether the base frequency is analyzed or a harmonic analysis is used. If it is not known exactly which defects are being sought, parameters optimized for a test task cannot be added. The advantage of this type of multi-frequency test is the identification and rejection of previously unknown deviations. A major disadvantage, though, is an increased pseudo rejection, since any deviation, regardless of its actual influence on the component quality, is sorted out.
Residual magnetic fields due to magnetization in the test component
The inspection resulting from the eddy current test is based on the electrical and magnetic properties of the test specimen. Residual magnetic fields in the test specimen, so-called remanence fields, directly influence the magnetic signal of the test specimen. This influence affects the test result and the decision of whether the test data regarding the hardness is correct or not. Furthermore, the influence can lead to increased scatter if the existing magnetic fields are random in their strength and orientation, and change over time or a batch of material. There are many constellations in production lines that lead to the magnetization of a component. A possible cause is magnetic transport devices or magnetized gripping devices. To solve this problem, demagnetization units are mostly used in production lines with eddy current testing. The demagnetization process removes residual magnetic fields from the components almost completely (usually less than A / cm) and is mainly carried out directly in front of the test facility.
Changes in the material composition influence the test result
Different alloy components can lead to a different permeability or a change in the conductivity in the test specimen. Like the hardness properties, these can influence the eddy current signal of the test specimen and pose a problem related to the process capability. It is therefore advisable to carry out a material mix test before hardening the components to ensure the correct use of the required material. The same eddy current testing devices can be used for material mix-up testing as well as for hardness testing.
Magnetic environmental influences in the production process
Crucial aspects to consider in eddy current-based hardness testing are the possible influencing factors on the test quality due to the general conditions of the production line itself. For instance, strong electric motors can generate magnetic fields, which in turn influence the test signals and lead to incorrect results. Furthermore, changes in a production line that has already been commissioned, e.g. the replacement of a gripper made of previously non-magnetic material with one made of a magnetic material, can influence the field distribution of the test coil.

Other disruptive factors can result from the replacement of a conveyor belt with a different conductivity. The change in the conductivity of the conveyor belt has a direct effect on the generated magnetic fields and thus on the test signals. The influence of changes in the production line on the reliability of the test should not be neglected. Materials must be carefully selected at an early stage in the development of a testing environment. After these changes, the results and stability of the test must be re-evaluated by a process approval.
Which eddy current test systems meet the challenges of hardness testing?
With the MAGNATEST D and MAGNATEST TCL, FOERSTER has developed powerful systems successfully used for many years as test systems for hardness testing. In various configuration options, they can flexibly be used as line or laboratory devices for a wide variety of test requirements.

Share this
You May Also Like
These Related Stories

What is eddy current testing?

Why is demagnetization becoming an ever-increasing necessary process?


